


- Preparation (maybe the most important step!)
- Covering
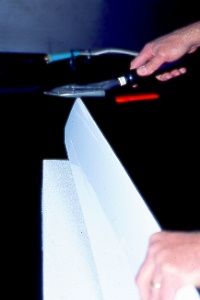
- Finishing
WHAT
REFERENCE TO USE?
There is lot of different brands and references of adhesive films, but they are not all well adapted to our application. The main vinyl brands we use are JAC and ORACAL. The best ratio price/quality for our use if the Oracal plotterfolie serie 651. Lot of different colors are available in this range. You can also have a look on the JAC Serilux product range.
The standard packaging is a roll of 25 m x 0.5 m if you order directly to the manufacturer. I recognize that it can be a little bit expensive if you just want to cover a rudder or a tailplane!
For 5 years now, french kit manufacturers sell this vinyl retail at a reasonable price (~ 2.4 Ł for 1m x 0.5m). In the operating mode, we can distinguish 3 main steps, which are:
PREPARATION
Like classical covering materials (i.e Solarfilm, Oracover....), the surface quality obtained will depend of your skills, of the wood type and the vinyl quality.
A very good surface quality will be difficult to obtain with balsa (which is too soft), but will be obtained easily with wood veneer. The best result is obtained with the Aningre (Latin name: Aningeria ) which has the particularity to have a very strong surface and thin grain (its color is dark brown). Between these two extremes, the Obechi give also really good result, with a little preparation.
Do not bypass this stage because the final result is directly linked to the care taken during the preparation.
For the preparation of the wing surface, we usually use abrasive paper (commonly use with water but that we use dry, of course). It is very resistant and can be vacuum-cleaned some times before being thrown.
But before sanding, it can be necessary to apply some filler cement, either to eliminate a large defect, or to make the wood fibers almost invisible. The ideal filler cement exists: Its aspect is comparable to the toothpaste. In all cases, the objective will consist in depositing what it is just necessary to fill in spaces between wood fibers. You will thus avoid a tiresome sandpapering. Unfortunately, I won’t give you any references because they are certainly different in each country.
Small detail, which helps for the finishing: We intercalate between the hold and the abrasive paper, a piece of foam, very flexible, of approximately 10 mm thick. Thus we obtain perfect curves (even visible to the eye under oblique light) and an impeccable surface quality by using a grain from 320 to 350 for balsa, 250 for samba and 220 with Aningre. A sanding with thinner sandpaper does not bring anything better to the finish after the covering.
If you have installed elastic flaps (using nylon ribbon), cut out and articulate the control surfaces (ailerons, flaps), installation of the A.F, etc.
During its handling, the vinyl attracts any kind of dust (static electricity). The only solution is to transform yourself into a beautiful cleaning lady: Pass the vacuum cleaner everywhere in the room where you plan to operate. I personally use an ironing board as worktable because the cotton sheet, which covers the table, is less sensible to the dust.
Outdoor or in another room, clean conscientiously your wings (and wing blanks) with an air compressor or a vacuum cleaner and finally with a clean rag by “whipping” the wings (and not by “rubbing”) in order to avoid new static electricity. Never use a wet rag to fix the dust, because the wood fibers will react immediately by inflating, and you will certainly have to redo the previous sanding operation.
For the very final cleaning of the surface of the wings, simply use your hands: This is, for the moment, the best tool that we found, and moreover which is equipped with very efficient sensors! Actually, you will feel under your hand the least dust or roughness, which, if you insist, will disappear. The hand’s skin acts like a thin sandpaper (grain: 400 or 600). Of course, all these advises are also applicable with any type of covering materials, not only adhesive films.


 Any comments, suggestions ?
Des commentaires, suggestions ? Send a message to Pierre
Rondel
Any comments, suggestions ?
Des commentaires, suggestions ? Send a message to Pierre
Rondel