... for Aerobatics
and VTPR* !
(*
Voltige Très Près du Relief)
Introduction:
Since the EPP exists and is very popular and widely used by large manufacturers,
there is an area where almost nobody went, excepted some very seldom small
specialised manufacturers: Aerobatic slope flying, and more particularly the
VTPR (Voltige très près du relief), invented in France, which consists in
flying aerobatics very close to the ground, without inertia, and with an extreme
agility. These flying style becomes less and less confidential all over the
world, and even our american friends really start to like VTPR after discovering
it on various forum and thanks to video sequences shared by french pilots.
Therefore this is an excellent news that Telink (www.telink.cz),
one of the precursor of the EPP in Europe introduces on the market this Multifun,
an small painted EPP glider, which should interrest most of you.
An
interesting concept
The
Multifun is in fact a 3 in 1 glider since you can build it in its aerobatics
version, in its " sport " version by adding two winglets, or in its beginner
version by using the 2 axis wings you can buy in option. Wings are removable
thanks to a piano wire joiner.

 The
Kit is very complete since you will find in the box:
The
Kit is very complete since you will find in the box:
-
2 x wing half of EPP, hot wired cutted, and painted
-
2 EPP parts to close the spar
-
2
EPP winglets
-
2 x wing spars (8/5 x 495 mm tube) (fiber glass tubes)
-
Hot wired cutted fuselage, painted, radio equipment space milled, root rib
in wood glued.
-
Several half round section EPP parts to finalise the fuselage.
-
The Tailplane, in one piece with hinge already milled
-
Fin and rudder, in one piece with hinge already milled
-
2 fuselage reinforcing carbon rods (1.5 mm diameter)
-
2 horizontal tail carbon stiffener (1mm diameter)
-
2 control linkage (rudder, elevator) + 2 bowden (rudder, elevator)
-
A small pocket with all the small parts needed to achieve the building
-
Building instruction, without text, but with plenty of very explicit and
self explained drawings.
What
is missing is the radio equipment and the glue to build the Multifun: I used
cyanoacrylate and a " Goop " equivalent called "résiste à tout".
Radio
equipment
The
recommended radio equipment is to use 9mm servos for the wings and for the
fuselage. Since I didn't have such servos in stock, I finally found old but
still good 13 mm Futaba servos that fit, but this is clearly the maximum thickness
that can be used. The receiver is a thin but 6 channels Corona receiver, and
the battery is composed of 4 AAA size cells, that I bought in a big supermarket.
They have 800 mAh of capacity.
An
innovating fuselage
 The
EPP, this wonderful material, has however the drawback to not allow to obtain
easily complex shapes, when hot wired cutted, without shaping and sanding.
Telink fixed this drawback in a very interesting manner by splitting the fuselage
in pieces: First of all the main part is a about 3 cm large silhouette fuselage,
on which come half round section EPP parts which bring the final touch without
any shaping nor sanding. Additionally, it allows to have a simili canopy that
gives access to the radio equipment, fully integrated in the fuselage.
The
EPP, this wonderful material, has however the drawback to not allow to obtain
easily complex shapes, when hot wired cutted, without shaping and sanding.
Telink fixed this drawback in a very interesting manner by splitting the fuselage
in pieces: First of all the main part is a about 3 cm large silhouette fuselage,
on which come half round section EPP parts which bring the final touch without
any shaping nor sanding. Additionally, it allows to have a simili canopy that
gives access to the radio equipment, fully integrated in the fuselage.
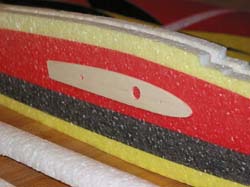
The
stiffness of this fuselage is obtained thanks to 2 carbon rods that are inserted
and glued on each side of the fuselage. This is very discreet especially if
you disimulate them with the decoration (using the border line between the
black and the yellow).
The
tailplane, before to be installed and glued in place, receives 2 thin carbon
spars (1mm) on the underside and upperside after doing a cutter line on the
surface of the tailplane. A small piece of plywood is glued as stiffener at
the function of the elevator control surfaces.
Then
we can installed the fin+rudder in place while paying attention to the alignment
with the tailplane and the fuselage. My tail and rudder servos being 13 mm
large, I had to enlarge a little bit the space reserved for them. They are
then fixed in place using goop like glue.The receiver takes place behind,
and must be easily removable in order to plug the ailerons when mounting the
plane before to fly.
To
finalise the fuselage there several holes to do:
-
one for the servos connectors to reach the receiver
-
one for the wing joiner
-
one for the front fiberglass incidence pins
The wings
The first operation
is to prepare the spars. They consists in fiberglass tubes, pretty heavy, that
receive on one end the piano wire joiner. In order to avoid the tube to explode
during a hard landing, the extremity of the tube is reinforced with a string
all around the tube, and glued with cyanoacrylate. The tube are then glued in
place and the remaining space is filled in with small parts of EPP supplied.
I found this step a little bit laborious and I personnaly think that it would
have been better to CNC cut the exact round space for the spar tube.
The next operation
is to install the servos in the space reserved for it. Once again, because I
used 13 mm servos, I had to enlarge the hole, and also dig it without fragilizing
it. The servos wire is inserted in the foam, and the connector exits on the
root rib. Try to have around 8 to 10 cm in order to reach the receiver.
The control horn
is glued in place with cyanoacrylate and accelerator before to connect the piano
wire control pushrod. The last operation is to install a small fiber glass pin
(3 mm diameter) to block the wing in rotation at the right incidence. The parts
provided are not very convenient since they are difficult to ajust and because
they desintegrate slowly in small fibers on the surface of the rod. Therefore,
I replaced them by the equivalent in carbon wich works perfectly.
Very good agility
in flight
 First
of all, the Multifun is not in its advantage when flying is very small conditions,
even if it is able to spirale, it is penalize by its lack of finesse. What prefers
the Multifun is a small and sharp slope with a light breeze giving a constant
lift. In that conditions, the Multifun will express all its potential and will
give you lots of satisfactions.
First
of all, the Multifun is not in its advantage when flying is very small conditions,
even if it is able to spirale, it is penalize by its lack of finesse. What prefers
the Multifun is a small and sharp slope with a light breeze giving a constant
lift. In that conditions, the Multifun will express all its potential and will
give you lots of satisfactions.
The plane is agile
on all axis: The ailerons are nervous and provide a very good roll precision
thanks also to the thin and high fuselage which brings a great stability in
trajectory. The elevator is more conventional, but the rudder is an example
of what should always be a rudder: amazing efficiency bur certainly not violent.
In any position of the plane or during rolls, the rudder is a pure joy to use
without any secondary effects. Therefore you can easily imagine that the Multifun
cannot fly " normally " but instead invites you immediately to fly aerobatics.
The only small
shadow is that because of the light weight and the small wing ratio, the Multifun
has a lack of inertia and consequently, vertical manoeuvres are not wide enough.
The addition of ballast should however improve this. For the rest, all manoeuvres
are possible, and even more. Knife edge flying is very simple thanks to the
lateral area of the fuselage. Rolls and steps rolls are a joy, the upside down
flight, whithout being exceptional, can stay for a very long time as soon as
the lift is sufficient. After few minutes, you will surprise you flying lower
and lower, closer and closer, doing lots of crazy things without any fear because
of the low inertia and the EPP material. The
upside down launch and catching is a simple exercice...
Conclusion
Without being at
the "state of the art" in term of aerodynamic design, the Multifun remains certainly
very interesting in its concept and in the pleasure it gives you in flight,
especially when flying aerobatics and VTPR. The kit is complete and the assembly
quick. The painted decoration brings the esthetic touch which is, from my point
of view a big plus. If you are looking for a kit of a small aerobatic glider,
then you should consider the Multifun because it is definitively designed for
that type of flying.

Copyright
© 1998 - 2007 Planet-Soaring.com
No commercial use or publication (e.g. on
other www or ftp sites, print media) without the written consent from the
author(s)